Working with Multiple Providers
- 참고 링크
- Code Github - 원서
0. 소개
single provider 블록
provider "aws" {
  region = "us-east-2"
}
- What if you need to deploy to multiple AWS regions?
- What if you need to deploy to multiple AWS accounts?
- What if you need to deploy to other clouds, such as Azure or GCP?
1. Working with One Provider
1.1 What is a Provider?
테라폼 구성
-
Core : 테라폼 바이너리이며, 모든 플랫폼에서 테라폼의 기본 기능을 제공(예. CMD)
This is the terraform **binary**, and it provides all the basic functionality in Terraform that is used by all platforms, such as a command-line interface (i.e., plan, apply, etc.), a parser and interpreter for Terraform code (HCL), the ability to build a dependency graph from resources and data sources, logic to read and write state files, and so on. Under the hood, the code is written in Go and lives in an open source GitHub repo owned and maintained by HashiCorp. -
Provider : 테라폼 코어를 위한 플러그인, 각 플러그인은 ‘AWS, Azure, GCP’ 등 외부 플랫폼과 통신
- 초기에는 HashiCorp 가 프로바이더를 만들었지만, 지금은 주요 공급자의 경우 해당 공급자 회사에서 직접 프로바이더를 관리
- 각 공급자는 특정 접두사를 할당하고, 해당 접두사를 포함하는 하나 이상의 리소스 및 데이터 소스를 표현합니다.
- 예시 **aws_ prefix** : aws_instance, aws_autoscaling_group, aws_ami
- 예시 **azurerm_ prefix** : azurerm_virtual_machine, azurerm_virtual_machine_scale_set, azurerm_image

```bash
The Terraform core communicates with plugins via remote procedure calls (RPCs), and those plugins,
in turn, communicate with their corresponding platforms via the network (e.g., via HTTP calls), as shown in Figure 7-1.
```
1.2 How Do You Install Providers?
Provider 설정- provider 선언 후 terraform init 시 자동으로 provider 의 코드를 다운로드
provider "aws" { region = "us-east-2" } $ terraform init Initializing provider plugins... - Finding hashicorp/aws versions matching "4.19.0"... - Installing hashicorp/aws v4.19.0... - Installed hashicorp/aws v4.19.0 (signed by HashiCorp) ...- provider 상세 설정
terraform { required_providers { <LOCAL_NAME> = { source = "<URL>" version = "<VERSION>" } } }- LOCAL_NAME : provider 가 사용할 local name 이며, 각 provider 에서 유일한 이름이여야 함. 드문 경우 지만 만약 두 공급자가 http 중복 사용 시 로컬 이름으로 구별 할 수 있음
- URL : 해당 provider 다운로드 URL 이며, 형식은
[<HOSTNAME>/]<NAMESPACE>/<TYPE이다- HOSTNAME 은 공급자를 배포하는 테라폼 레지스트리의 호스트 이름, 생략 시 테라폼 공개 레지스트리를 가리킴
- NAMESPACE 는 조직 네임스페이스(일반적으로 회사 이름)
- TYPE은 공급자가 관리하는 플랫폼의 이름(일반적으로 TYPE는 기본 로컬 이름)
- 예 aws 공급자 전체 URL) registry.terraform.io/hashicorp/aws → 생략 표현 가능 hashicorp/aws
- VESION : 버전 조건, 예를 들어
4.19.0처럼 특정 버전을 지정하거나,> 4.0 , < 4.3처럼 버전 범위를 지정 - 아래는 aws 4.x 공급자 버전 설치를 지정하는 코드 예시
  terraform {
    required_providers {
      aws = {
        source  = "hashicorp/aws"
        version = "~> 4.0"
      }
    }
  }
1.3 How Do You Use Providers?
사용
-
required_providers 블록을 설정
terraform { required_providers { aws = { source = "hashicorp/aws" version = "~> 4.0" } } } -
provider 블록을 설정
 provider "aws" {
   region = "us-east-2"
 }
2. Working with Multiple copies of the same provider
2.1 Working with Multiple AWS Regions
-
[실습] 2개의 리전에 배포 시
provider "aws" { region = "us-east-2" } provider "aws" { region = "us-west-1" }- 리전간 ‘리소스, 데이터 소스, 모듈’에 대한 구별? ⇒
alias활용
  provider "aws" {
    region = "us-east-2"
    alias  = "region_1"
  }

  provider "aws" {
    region = "us-west-1"
    alias  = "region_2"
  }

  data "aws_region" "region_1" {
    provider = aws.region_1
  }

  data "aws_region" "region_2" {
    provider = aws.region_2
  }

  output "region_1" {
    value       = data.aws_region.region_1.name
    description = "The name of the first region"
  }

  output "region_2" {
    value       = data.aws_region.region_2.name
    description = "The name of the second region"
  }
실습 따라하기
# 이동 cd ~/terraform-up-and-running-code/code/terraform/07-working-with-multiple-providers # 테라폼 코드 파일 생성 cat <<EOT > multple-region.tf terraform { required_version = ">= 1.0.0, < 2.0.0" required_providers { aws = { source = "hashicorp/aws" version = "~> 4.0" } } } provider "aws" { region = "us-east-2" alias = "region_1" } provider "aws" { region = "us-west-1" alias = "region_2" } data "aws_region" "region_1" { provider = aws.region_1 } data "aws_region" "region_2" { provider = aws.region_2 } output "region_1" { value = data.aws_region.region_1.name description = "The name of the first region" } output "region_2" { value = data.aws_region.region_2.name description = "The name of the second region" } EOT # init & plan & apply tfenv use 1.2.3 **terraform init terraform plan & terraform apply -auto-approve** Outputs: region_1 = "us-east-2" region_2 = "us-west-1" - 리전간 ‘리소스, 데이터 소스, 모듈’에 대한 구별? ⇒
- [실습] 2개의 리전에 Ubuntu EC2 배포 시
- 리전 별 AMI ID값이 다르므로, 필터를 활용하자
data "aws_ami" "ubuntu_region_1" { provider = aws.region_1 most_recent = true owners = ["099720109477"] # Canonical filter { name = "name" values = ["ubuntu/images/hvm-ssd/ubuntu-focal-20.04-amd64-server-*"] } } data "aws_ami" "ubuntu_region_2" { provider = aws.region_2 most_recent = true owners = ["099720109477"] # Canonical filter { name = "name" values = ["ubuntu/images/hvm-ssd/ubuntu-focal-20.04-amd64-server-*"] }- ami 참조
resource "aws_instance" "region_1" { provider = aws.region_1 ami = data.aws_ami.ubuntu_region_1.id instance_type = "t2.micro" } resource "aws_instance" "region_2" { provider = aws.region_2 ami = data.aws_ami.ubuntu_region_2.id instance_type = "t2.micro" }- (옵션) output 으로 배포된 가용 영역(az) 확인
  output "instance_region_1_az" {
    value       = aws_instance.region_1.availability_zone
    description = "The AZ where the instance in the first region deployed"
  }

  output "instance_region_2_az" {
    value       = aws_instance.region_2.availability_zone
    description = "The AZ where the instance in the second region deployed"
  }
실습 따라하기
# [터미널1] us-east-2 while true; do aws ec2 describe-instances --region us-east-2 --query "Reservations[*].Instances[*].{PublicIPAdd:PublicIpAddress,InstanceName:Tags[?Key=='Name']|[0].Value,Status:State.Name}" --filters Name=instance-state-name,Values=running --output text ; echo "------------------------------" ; sleep 1; done # [터미널2] us-west-1 while true; do aws ec2 describe-instances --region us-west-1 --query "Reservations[*].Instances[*].{PublicIPAdd:PublicIpAddress,InstanceName:Tags[?Key=='Name']|[0].Value,Status:State.Name}" --filters Name=instance-state-name,Values=running --output text ; echo "------------------------------" ; sleep 1; done # 이동 cd ~/terraform-up-and-running-code/code/terraform/07-working-with-multiple-providers/examples/multi-region cat main.tf outputs.tf # init & plan & apply terraform init terraform plan && terraform apply -auto-approve Outputs: instance_region_1_az = "us-east-2c" instance_region_2_az = "us-west-1c" region_1 = "us-east-2" region_2 = "us-west-1" # 삭제 : 아래 RDS 배포 후 데이터 INSERT 등 실습 후 삭제해도 됨 terraform destroy -auto-approve - [실습] Primary RDS 의 replica RDS를 다른 리전에 배포 시
-
Primary RDS 는 backup_retention_period 설정이 0보다 커야 되며, replicate_source_db ARN 설정 시 replica RDS 이다 - 링크
variable "backup_retention_period" { description = "Days to retain backups. Must be > 0 to enable replication." type = number default = null } variable "replicate_source_db" { description = "If specified, replicate the RDS database at the given ARN." type = string default = null } -
모듈의 main.tf 에서 사용 확인 : Primary 와 replica RDS가 다르므로 분기 사용 - 링크
resource "aws_db_instance" "example" { identifier_prefix = "terraform-up-and-running" allocated_storage = 10 instance_class = "db.t2.micro" skip_final_snapshot = true # Enable backups backup_retention_period = var.backup_retention_period # If specified, this DB will be a replica replicate_source_db = var.replicate_source_db # Only set these params if replicate_source_db is not set engine = var.replicate_source_db == null ? "mysql" : null db_name = var.replicate_source_db == null ? var.db_name : null username = var.replicate_source_db == null ? var.db_username : null password = var.replicate_source_db == null ? var.db_password : null } -
참고로 아래 값 미지정 시 null 지정됨 - 링크
variable "db_name" { description = "Name for the DB." type = string default = null } variable "db_username" { description = "Username for the DB." type = string sensitive = true default = null } variable "db_password" { description = "Password for the DB." type = string sensitive = true default = null } -
replica RDS 는 primary RDS의 ARM 정보 참조 필요 : output 출력 - 링크
  output "arn" {
    value       = aws_db_instance.example.arn
    description = "The ARN of the database"
  }
실습 따라하기: 백엔드 리소스 배포- S3/DynamoDB 생성
- S3/DynamoDB 생성을 위한 환경변수 지정
# 환경변수에 지정 export TF_VAR_bucket_name=gasida-t101-tfstate export TF_VAR_table_name=gasida-t101-locks # 환경변수 확인 export | grep TF_VAR_- 배포
# 이동 cd ~/terraform-up-and-running-code/code/terraform/03-terraform-state/file-layout-example/global/s3 cat main.tf variables.tf # 초기화 및 검증 및 배포 : 환경변수 적용 확인 terraform init terraform plan && terraform apply -auto-approve # 확인 aws s3 ls aws dynamodb list-tables --output text -
Primary RDS 리소스 생성 코드 내용 확인 - 링크
module "mysql_primary" { source = "../../../../modules/data-stores/mysql" db_name = var.db_name db_username = var.db_username db_password = var.db_password # Must be enabled to support replication backup_retention_period = 1 } -
Replica RDS 리소스 생성 코드 내용 확인
module "mysql_replica" { source = "../../../../modules/data-stores/mysql" # Make this a replica of the primary replicate_source_db = module.mysql_primary.arn } -
리전 간 리소스 구분을 위해서 alias 사용 - 링크
provider "aws" { region = "us-east-2" alias = "primary" } provider "aws" { region = "us-west-1" alias = "replica" } ... module "mysql_primary" { source = "../../../../modules/data-stores/mysql" providers = { aws = aws.primary } db_name = var.db_name db_username = var.db_username db_password = var.db_password # Must be enabled to support replication backup_retention_period = 1 } module "mysql_replica" { source = "../../../../modules/data-stores/mysql" providers = { aws = aws.replica } # Make this a replica of the primary replicate_source_db = module.mysql_primary.arn } -
마지막으로 output 출력 - 링크
output "primary_address" { value = module.mysql_primary.address description = "Connect to the primary database at this endpoint" } output "primary_port" { value = module.mysql_primary.port description = "The port the primary database is listening on" } output "primary_arn" { value = module.mysql_primary.arn description = "The ARN of the primary database" } output "replica_address" { value = module.mysql_replica.address description = "Connect to the replica database at this endpoint" } output "replica_port" { value = module.mysql_replica.port description = "The port the replica database is listening on" } output "replica_arn" { value = module.mysql_replica.arn description = "The ARN of the replica database" } -
배포
  # [터미널1] us-east-2
  while true; do aws rds describe-db-instances --region us-east-2 --query "*[].[Endpoint.Address,Endpoint.Port,MasterUsername]" --output text  ; echo "------------------------------" ; sleep 1; done

  # [터미널2] us-west-1
  while true; do aws rds describe-db-instances --region us-west-1 --query "*[].[Endpoint.Address,Endpoint.Port,MasterUsername]" --output text  ; echo "------------------------------" ; sleep 1; done

  # 환경변수에 지정
  export TF_VAR_db_username='cloudneta'
  export TF_VAR_db_password='cloudnetaQ!'

  # 이동
  cd ~/terraform-up-and-running-code/code/terraform/07-working-with-multiple-providers/live/prod/data-stores/mysql

  # main.tf 에 백엔드 부분 수정
  vi main.tf
    backend "s3" {
      # This backend configuration is filled in automatically at test time by Terratest. If you wish to run this example
      # manually, uncomment and fill in the config below.
      bucket         = "gasida-t101-tfstate"
      key            = "prod/data-stores/mysql/terraform.tfstate"
      region         = "us-east-2"
      dynamodb_table = "gasida-t101-locks"
      # encrypt        = true
    }

  # 초기화 및 검증 : 환경변수 적용 확인
  terraform init
  terraform plan

  # 배포 : 총 25분 정도 소요 (8분 후 primary 완료, 이후 16분 후 replica 생성 및 동기화 완료)
  terraform apply -auto-approve
  terraform output
  aws s3 ls s3://$TF_VAR_bucket_name --recursive --human-readable --summarize

  # (옵션) Primary RDS에 데이터 INSERT 후 Replica RDS에 복제되는지 확인 해볼것

  # 삭제 6분 정도 소요
  terraform destroy -auto-approve

  # S3/DynamoDB 삭제
  cd ~/terraform-up-and-running-code/code/terraform/03-terraform-state/file-layout-example/global/s3
  terraform destroy -auto-approve
-
2가지 주의 사항
- Warning 1 : Multiregion is hard 프로덕션 수준의 멀티 리전은 어렵다
- Active-Active 멀티 리전 서비스를 위해서 ‘지역간 지연 시간, 고유 ID, 최종 일관성’ 등 여러가지 고려사항이 많아서 쉽지 않다.
- Warning 2 : Use aliases sparingly Alias 를 빈번하게 사용하지 말자
- 별칭을 사용하여 두 리전에 배포하는 단일 테라폼 모듈은 한 리전이 다운 시, plan 과 apply 시도가 실패합니다
- 프로덕션 환경은 멀티 리전의 별칭을 사용하는 것보다는, 3장에서 설명한 것 처럼 환경을 완전히 격리해야 합니다. 이를 통해 영향도를 최소화 할 수 있습니다.
2.2 Working with Multiple AWS Accounts
멀티 계정 사용 이유
- Isolation (aka compartmentalization)
- Staging 과 Prod 간 다른 계정을 사용함으로써 영향도 최소화
- Authentication and authorization
- 다중 계정에 따른 인증과 권한 분리로 영향도 최소화(예를 들면 권한을 잘못 부여 시) 및 계정 별 다른 권한으로 통제 가능
- Auditing and reporting
- 모든 환경과 계정의 변경 사항 및 감사 추적을 위지하고, 규정 준수와 이상 징후 감시를 할 수 있고 비용 추적등에 용이
-
사전 준비-
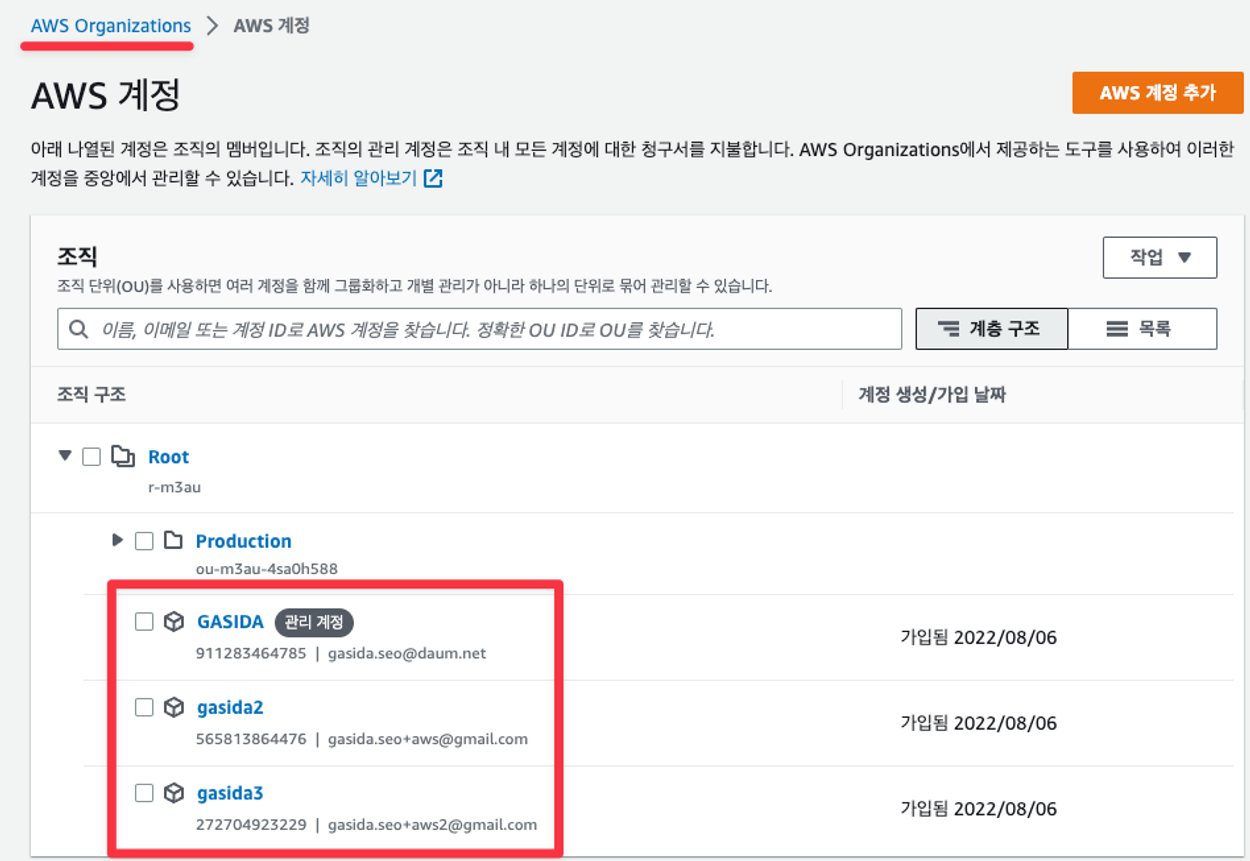
AWS Account 최소 2개 이상 생성 해두기 (아래는 예시)
가입 이메일명 AWS Account ID 별칭 IAM User(관리자 수준) gasida.seo@gmail.com 911283464785 awsgasida admin gasida.seo+aws1@gmail.com 565813864476 awsgasida2 admin gasida.seo+aws2@gmail.com 272704923229 awsgasida3 admin aws sts get-caller-identity --query Account --output text 911283464785 -
AWS Organizations 설정 및 계정 초대(추가) 해두기
-
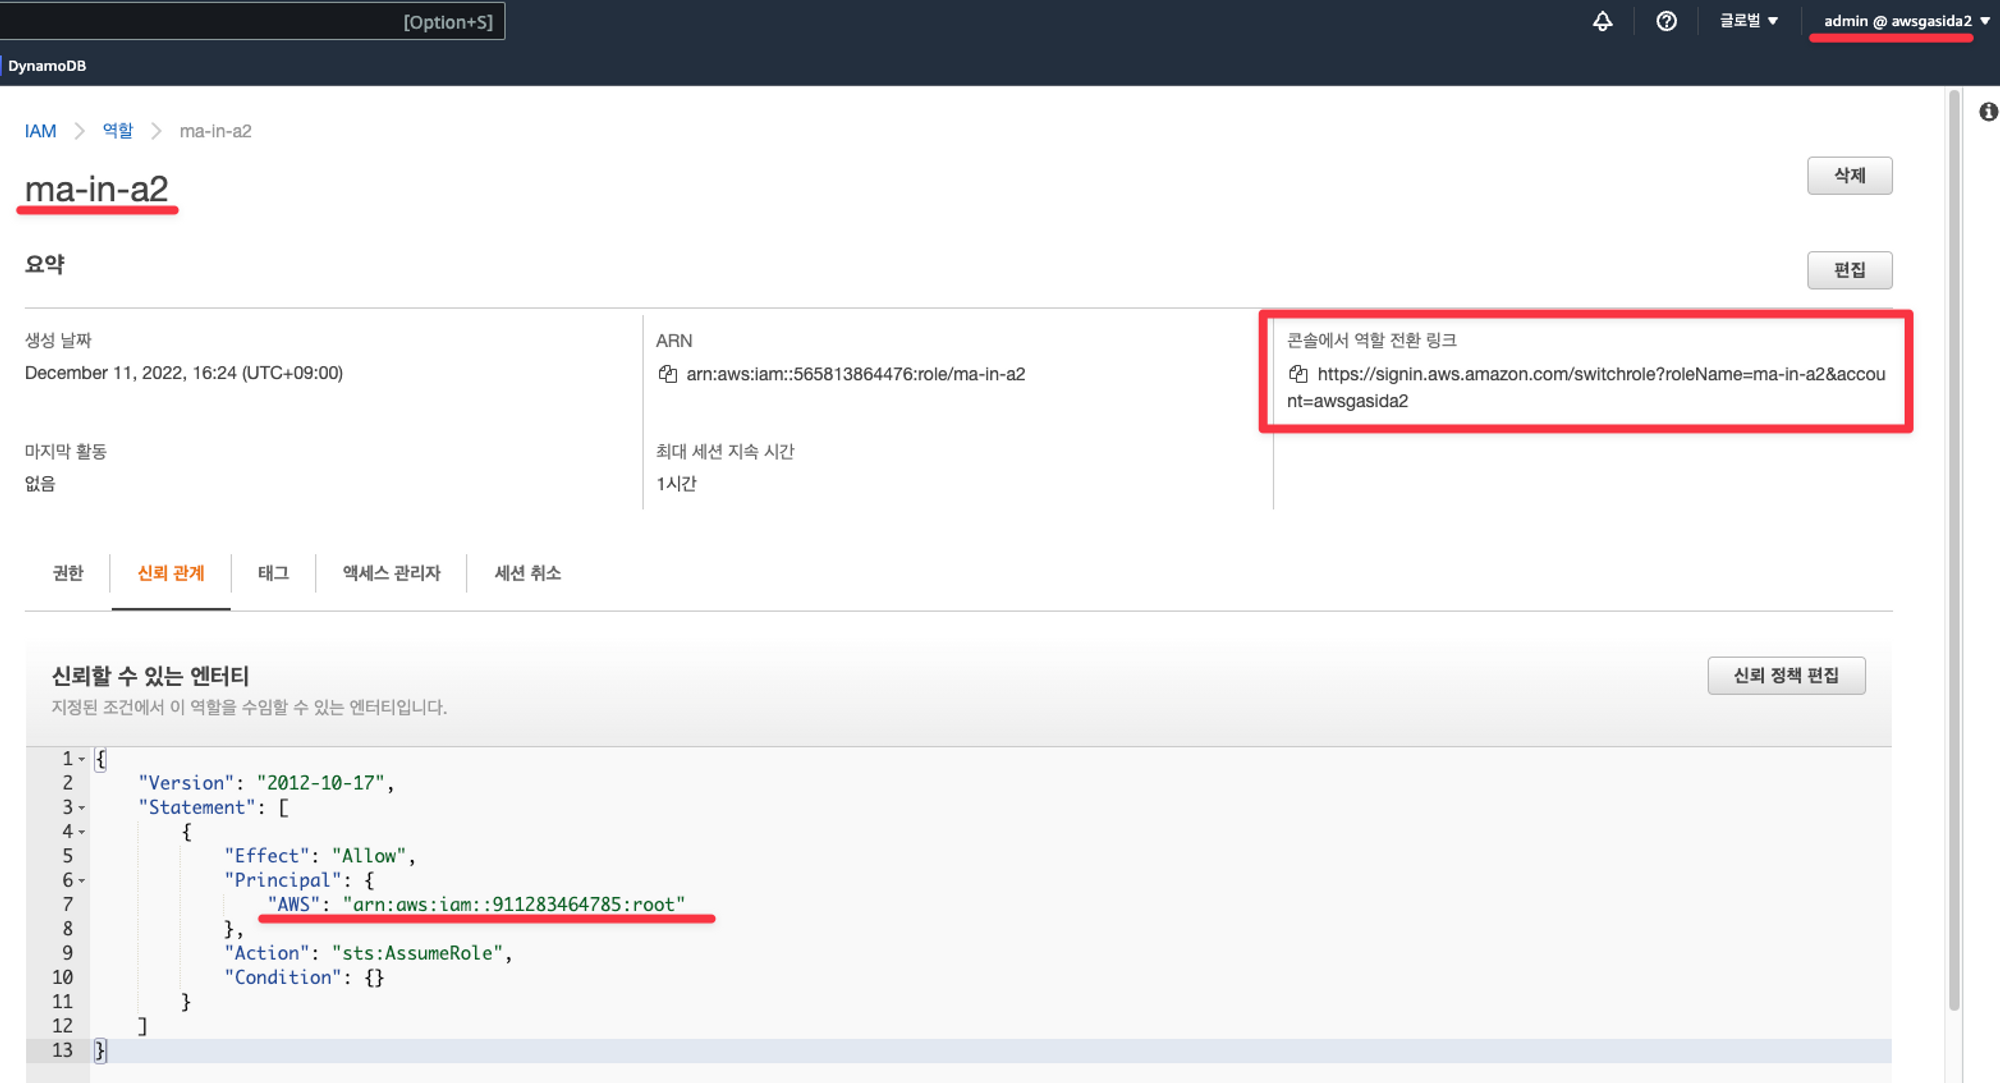
계정 간 역할 전환을 위한 IAM Role 설정 해두기 : 세번째 계정에 IAM Role 설정하는 것 보여주기
-
첫 번째 계정에서 S3 버킷 정보 확인 → 두 번째 계정으로 역할 전환 후 S3 버킷 정보 확인 해보기 → 다시 전환 후 S3 버킷 정보 확인
-
-
실습 따라하기-
main.tf 파일 확인 : alias child 는 IAM Role 역할 전환 - 링크
provider "aws" { region = "us-east-2" alias = "parent" } provider "aws" { region = "us-east-2" alias = "child" assume_role { role_arn = var.child_iam_role_arn } } data "aws_caller_identity" "parent" { provider = aws.parent } data "aws_caller_identity" "child" { provider = aws.child } -
variables.tf 파일 확인 - 링크
variable "**child_iam_role_arn**" { description = "The ARN of an IAM role to assume in the child AWS account" type = string } -
outputs.tf 파일 확인 : 각각의 caller 의 AWS Account 출력 - 링크
output "parent_account_id" { value = data.aws_caller_identity.parent.account_id description = "The ID of the parent AWS account" } output "child_account_id" { value = data.aws_caller_identity.child.account_id description = "The ID of the child AWS account" } -
배포 및 확인
  # 이동
  cd ~/terraform-up-and-running-code/code/terraform/07-working-with-multiple-providers/examples/multi-account-root
  cat main.tf variables.tf

  # IAM Role ARN 지정
  #export TF_VAR_child_iam_role_arn='arn:aws:iam::<자신의 두번쨰 혹은 세번째 계정 Account ID>:role/<해당 계정의 IAM Role 이름>'
  export TF_VAR_child_iam_role_arn='arn:aws:iam::565813864476:role/ma-in-a2'

  # 배포 확인
  terraform init
  terraform plan && terraform apply -auto-approve
  Outputs:
  child_account_id = "565813864476"
  parent_account_id = "911283464785"
-
2가지 주의 사항
- Warning 1 : Cross-account IAM roles are double opt-in
- 교차 계정 역할 동작을 위해서 2개의 계정에서 모두 권한 등 설정이 필요함
- Warning 2 : Use aliases sparingly Alias 를 빈번하게 사용하지 말자
- 영향도 최소를 위해서 계정 간 분리를 하는 것을 권장
2.3 Creating modules that can work with multiple providers
2.2와 거의 유사하여 Skip
3. Working with multiple different providers
도커와 쿠버네티스 실습 환경에서 진행되어 Skip